Dependencies in TypeScript
In Windmill standard mode, dependencies in TypeScript are handled directly within their scripts without the need to manage separate dependency files. For TypeScript, there are two runtime options available: Bun and Deno. Both of these runtimes allow you to include dependencies directly in the script, and Windmill automatically handles the resolution and caching of these dependencies to ensure fast and consistent execution (this is standard mode).
There are however methods to have more control on your dependencies:
- Leveraging standard mode on web IDE or locally.
- Overriding dependencies providing a package.json.
- Bundling per script with CLI, more powerful and local only.
Moreover, there are two other tricks, compatible with the methodologies mentioned above:
- Sharing Common Logic with Relative Imports when not using Bundles.
- Private npm Registry & Private npm Packages.
To learn more about how dependencies from other languages are handled, see Dependency Management & Imports.

Lockfile per Script inferred from Imports (Standard)
In Windmill, you can run scripts without having to manage a package.json directly. This is achieved by automatically parsing the imports and resolving the dependencies.
When using Bun as the runtime for TypeScript in Windmill, dependencies are resolved directly from the script imports and their imports when using sharing common logic. The TypeScript runtime Bun ensures 100% compatibility with Node.js without requiring any code modifications.
// unpinned import
import { toWords } from 'number-to-words';

// versioned import
import * as wmill from 'windmill-client@1.147.3';
Similarly, for TypeScript scripts using Deno as the runtime, the dependencies and their versions are specified directly in the script, and the resolution is managed by Deno. This method allows for direct use of npm imports and Windmill client imports without requiring any additional configuration for dependency management.
// unpinned import
import { toWords } from 'npm:number-to-words';

// versioned import
import * as wmill from 'npm:windmill-client@1.335.0';
Web IDE
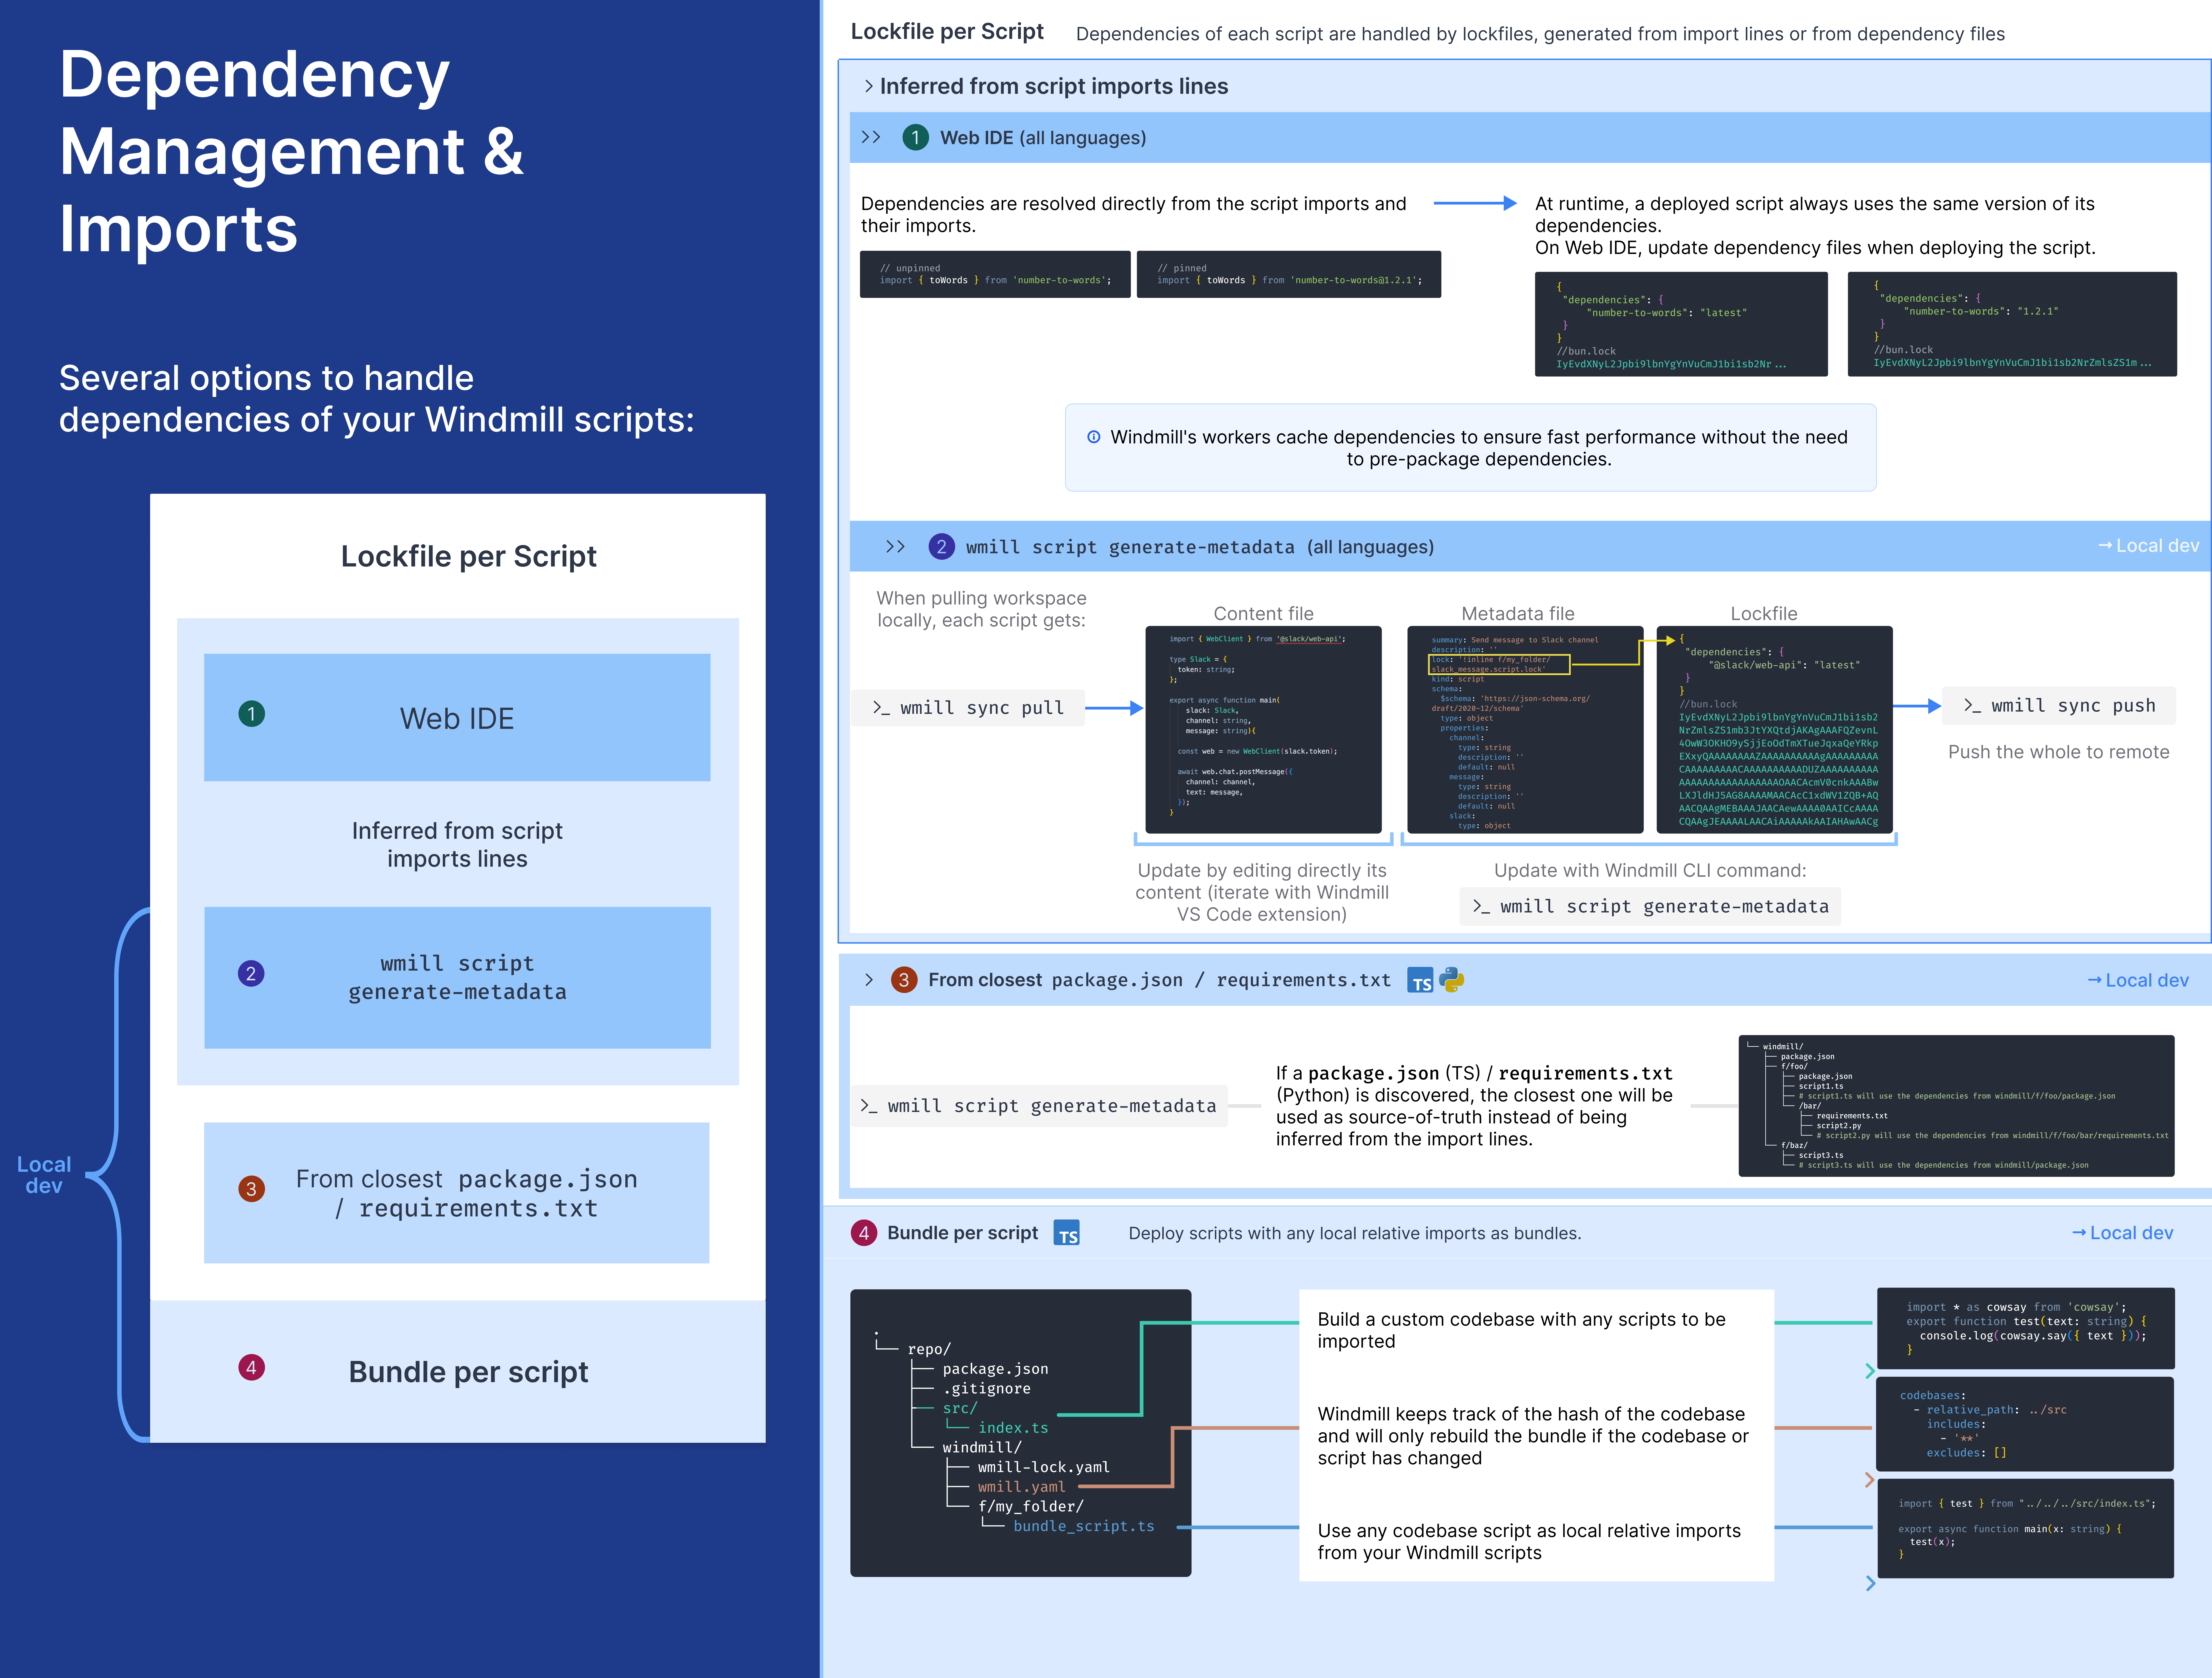
When a script is deployed through the Web IDE, Windmill generates a lockfile to ensure that the same version of a script is always executed with the same versions of its dependencies. To generate a lockfile, it analyzes the imports, the imports can use a version pin (e.g. windmill-client@1.147.3) or if no version is used, it uses the latest version. Windmill's workers cache dependencies to ensure fast performance without the need to pre-package dependencies - most jobs take under 100ms end-to-end.
At runtime, a deployed script always uses the same version of its dependencies.
At each deployment, the lockfile is automatically recomputed from the imports in the script and the imports used by the relative imports. The computation of that lockfile is done by a dependency jobs that you can find in the Runs page.
CLI
On local development, each script gets:
- a content file (
script_path.py,script_path.ts,script_path.go, etc.) that contains the code of the script, - a metadata file (
script_path.yaml) that contains the metadata of the script, - a lockfile (
script_path.lock) that contains the dependencies of the script.
You can get those 3 files for each script by pulling your workspace with command wmill sync pull.
Editing a script is as simple as editing its content. The code can be edited freely in your IDE, and there are possibilities to even run it locally if you have the correct development environment setup for the script language.
Using wmill CLI command wmill script generate-metadata, lockfiles can be generated and updated as files. The CLI asks the Windmill servers to run dependency job, using either the package.json (if present) or asking Windmill to automatically resolve it from the script's code as input, and from the output of those jobs, create the lockfiles.
When a lockfile is present alongside a script at time of deployment by the CLI, no dependency job is run and the present lockfile is used instead.
Lockfile per Script inferred from a package.json
Although Windmill can automatically resolve imports. It is possible to override the dependencies by providing a package.json file in the same directory as the script as you would do in a standard Node.js project, building and maintaining a package.json to declare dependencies.
When doing wmill script generate-metadata, if a package.json is discovered, the closest one will be used as source-of-truth instead of being discovered from the imports in the script directly to generate the lockfile from the server.
You can write those package.json manually or through a standar npm install <X>.
Several package.json files can therefore coexist, each having authority over the scripts closest to it:
└── windmill_folder/
    ├── package.json
    ├── f/foo/
    │   ├── package.json
    │   ├── script1.ts
    │   ├── # script1.ts will use the dependencies from windmill_folder/f/foo/package.json
    │   └── /bar/
    │       ├── package.json
    │       ├── script2.ts
    │       └── # script2.ts will use the dependencies from windmill_folder/f/foo/bar/package.json
    └── f/baz/
        ├── script3.ts
        └── # script3.ts will use the dependencies from windmill_folder/package.json
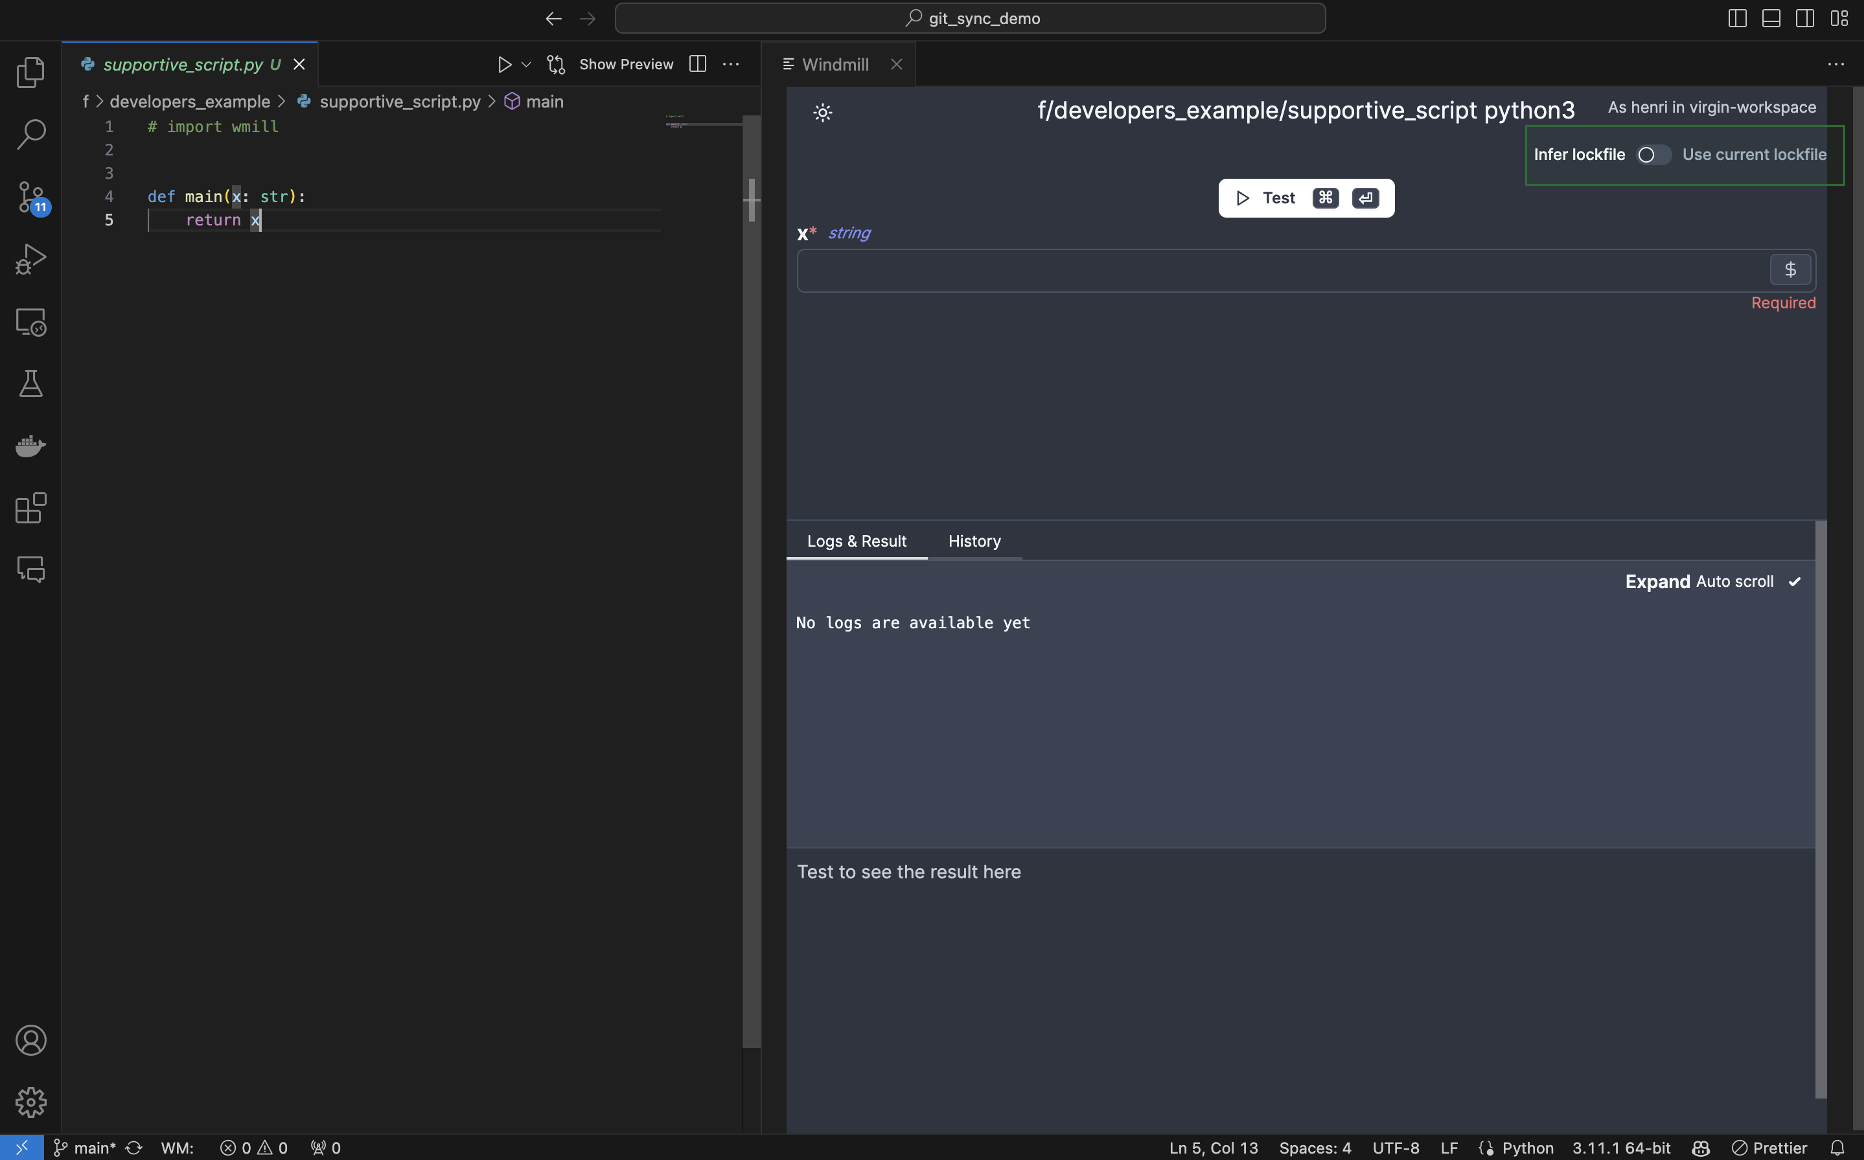
The Windmill VS Code Extension has a toggle "Infer lockfile" / "Use current lockfile".
With this toggle, you can choose to use the metadata lockfile (derived from package.json after wmill script generate-metadata) instead of inferring them directly from the script.

Bundle per Script built by CLI
This method can only be deployed from the CLI, on local development.
To work with large custom codebases, there is another mode of deployment that relies on the same mechanism as similar services like Lambda or cloud functions: a bundle is built locally by the CLI using esbuild and deployed to Windmill.
This bundle contains all the code and dependencies needed to run the script.
Windmill CLI, it is done automatically on wmill sync push for any script that falls in the patterns of includes and excludes as defined by the wmill.yaml (in the codebase field).
Other
Two tricks can be used: Relative Imports and Private npm Registry & Private npm Packages. Both are compatible with the methods described above.
Sharing Common Logic with Relative Imports when not using Bundles
If you want to share common logic with Relative Imports when not using Bundles, this can be done easily using relative imports in both Bun and Deno.
This applies for all methods above, except absolute imports do not work for codebases and bundles.
Note that in both the webeditor and with the CLI, your scripts do not necessarily need to have a main function. If they don't, they are assumed to be shared logic and not runnable scripts.
It works extremely well in combination with Developing scripts locally and you can easily sync your scripts with the CLI.
It is possible to import directly from other TypeScript scripts. One can simply follow the path layout. For instance,
import { foo } from "../script_name.ts". A more verbose example below:
import { main as foo, util } from '../my_script_path.ts';
Relative imports syntax is much preferred as it will work on local editors without further configuration.
You may also use absolute imports:
import { main as foo, util } from '/f/<foldername>/script_name.ts';

export async function main() {
	await foo();
	util();
}
but to make it work with your local editor, you will need the following configuration in tsconfig.json
{
	"compilerOptions": {
		"paths": {
			"/*": ["./*"]
		}
	}
}
Note that path in Windmill can have as many depth as needed, so you can have paths like this f/folder/subfolder/my_script_path.ts and relative imports will work at any level. Hence, it will work exactly the same as on local.
Private npm Registry & Private npm Packages
You can use private npm registries and private npm packages in your TypeScript scripts.
This applies to all methods above. Only, if using Codebases & bundles locally, there is nothing to configure in Windmill, because the bundle is built locally using your locally-installed modules (which support traditional npm packages and private npm packages).

On Enterprise Edition, go to Instance settings -> Core -> NPM Config Registry.
Set the registry URL: https://npm.pkg.github.com/OWNER (replace OWNER with your GitHub username or organization name).
Currently, Deno does not support private npm packages requiring tokens (but support private npm registries). Bun however does.
If a token is required, append :_authToken=<your url> to the URL.
Combining the two, you can import private packages from npm
https://registry.npmjs.org/:_authToken=npm_bKZp1kOKzWsNPUvx2LpyUzIJqi2uaw23eqw
If the private registry is exposing custom certificates,DENO_CERT and DENO_TLS_CA_STORE env variables can be used as well (see Deno documentaion for more info on those options).
windmill_worker:
  ...
  environment:
    ...
    - DENO_CERT=/custom-certs/root-ca.crt